Introduction
Welcome to The Bolt Book! ⚡
Bolt is an open-source project, currently in its early development phase, and warmly welcomes contributors. For additional resources, join the community on Discord.
This chapter covers what bolt is, how its documentation is structured, and what you should know to have a good time with this guide.
If you find errors or something doesn't work, please report it here.
What is Bolt
Bolt is a high-performance, scalable SVM-based framework designed for Fully On Chain (FOC) Games and Autonomous Worlds.
With Bolt, you can create games that live forever on the blockchain. These games are platform-centric by default, empowering users to extend and modify both game content and logic. Bolt facilitates multiplayer gaming experiences with performances on pair with traditional multiplayer servers.
Furthermore, the framework incorporates an Entity Component System (ECS) architecture, streamlining the game structuring and assembly process and providing ready-to-use components. Developers can reuse and contribute modules and logic deployed on the blockchain.
All these features collectively reduce the intricacy of crafting fully on-chain games, enabling developers to focus more on the game's essence.
Explainer
Here's a video of Magibclock's co-founders explaining how BOLT works at the 2023 Breakpoint Conference:
Entity, Component and Systems (ECS)
The framework includes a standardized way to model the game logic, using the ECS (Entity, Components and Systems), which is commonly used in the gaming industry and also adopted in most on-chain engines.
This pattern decouples logic from state, enabling optimizations in terms of performance and scalability. Additionally, its modular nature facilitates code reusability and extensibility, which are two essential properties for fully on-chain games and autonomous worlds.
The Solana Virtual Machine makes use of a paradigm similar to an ECS. The state (the accounts) and the logic (the programs) are natively separated.
When we compare it to Solana's architecture, it becomes evident how easily the ECS can be implemented:
- Entities: An entity is a general-purpose object typically represented by a unique identifier. It doesn't directly contain any data or behaviour but serves as an identifier for a collection of components. Entities can be registered in a world instance account on Solana and could themselves be accounts.
- Components: Raw data structure that represents some aspect or attribute of an entity. For instance, a PositionComponent might just contain x, y, and z coordinates. This is concept is essentially equivalent to accounts on Solana.
- Systems: Performs the game logic or behaviour by acting upon entities that have specific components. Systems are essentialy programs on Solana, which only specify the logic and the accounts they operate on.
Solana's Program Derived Addresses (PDAs) facilitate the efficient storage and retrieval of entities, components and system mimicking a hash table-like structure.
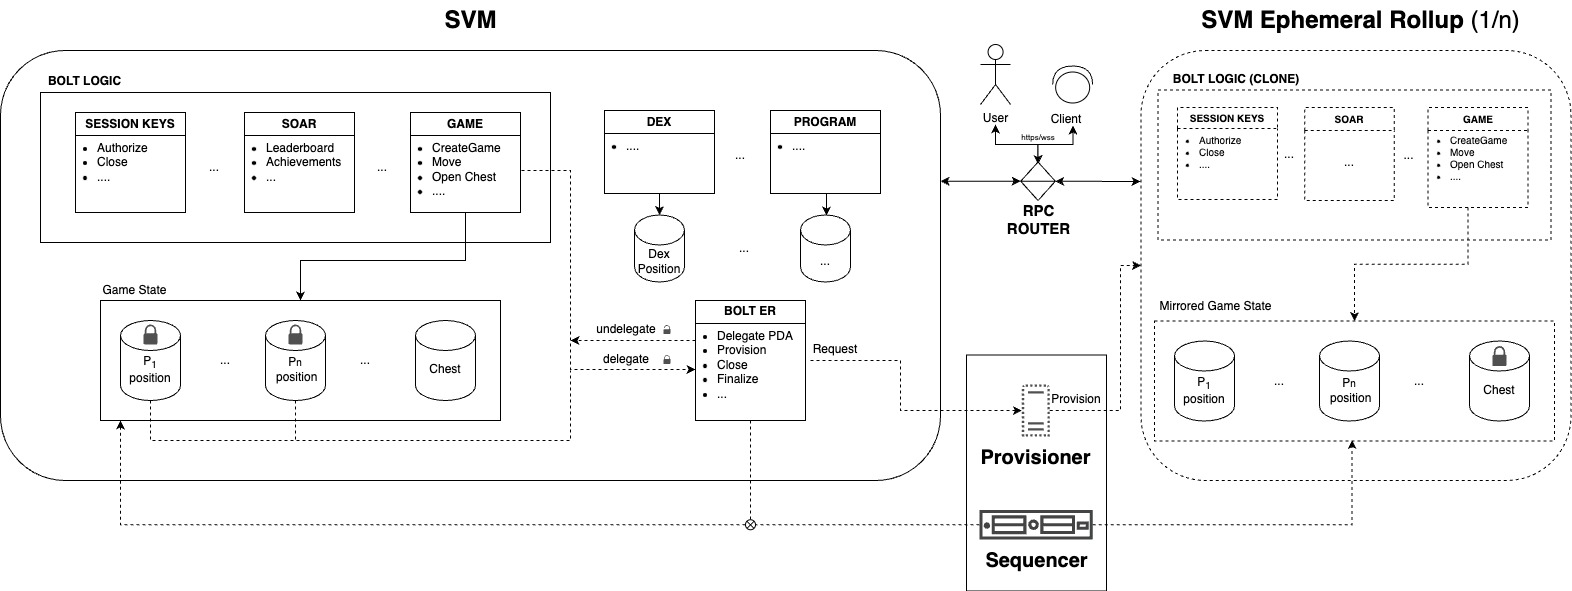
Ephemeral Rollups
The core intuition is that by harnessing the SVM's account structure and its capacity for parallelization, we can split the app/game state into clusters. Users can lock one or multiple accounts to temporarily transfer the state to an auxiliary layer, which we define as the "ephemeral rollup", a configurable dedicated runtime.
This process temporarily entrusts the sequencer to modify the accounts in the ephemeral rollup, where the state can be forcefully reverted and unlocked on the L1 if constraints are not satisfied (read the whitepaper for more details). Despite this delegation, operations and transactions can still use the delegate accounts as readable on the base layer. Non-delegated accounts remain unaffected and modifiable.
The ephemeral rollup operates as a specialized SVM runtime to facilitate transaction processing at an elevated throughput. Additionally, this specialized runtime can be customized to include configurations like gasless transactions, quicker block-time, and the inclusion of a ticking mechanism (i.e., an integrated transaction scheduling system like clockwork) operated without fees). The entire process is transparent to the end user - a specialized RPC provider can route the transactions to the base layer and the ephemeral rollup(s) in parallel during the game session.
White Paper
Bolt white paper describes in details the architecture and the scalability solution. We recommend reading the basic concepts of ephemeral rollups in section 2.2 of the Bolt Whitepaper
Avoiding Fragmentation and Benefits
The benefit of ER is that programs and assets reside directly on the base layer. Transactions can be accelerated through ERs, which are fully compatible with the Solana Virtual Machine (SVM) down to the bytecode level. Any improvements or advancements at the base layer are immediately available, without the need to modify or re-deploy programs.
Ephemeral Rollups has the following benefits:
-
Developers deploy programs to the base layer (e.g., Solana), rather than on a separate chain as it would normally happen with rollups. Programs live on the base layer and can interact with any existing protocol and assets. ERs don't fragment the existing ecosystem and allow the speed-up of targeted operations without creating an isolated environment.
-
Users, developers and programs using ERs can take advantage of Solana's infrastructure. This includes programming languages, code libraries, testing tools, client software, deployment infrastructure etc.
-
The specialized runtime can accommodate game-specific customizations (e.g., ticking or passive events, typical in games, as opposed to the event-driven runtime of blockchains) without the need to pay gas for fees on those specific accounts.
-
This approach enables a highly scalable system capable of launching rollups on-demand, auto-scaling horizontally to accommodate users performing millions of transactions without the tradeoffs of traditional L2s.
Mapping and State listening
The standardized ECS pattern allows for easy integration of game components with a rendering engine to display the game interface. Bolt can be viewed as an open and permissionless alternative to a backend intended as a multiplayer game server.
For visualization and rendering, existing engines such as Unity, Unreal Engine, Phaser, and others can be used.
The standardized structure of the components allows for automatic mapping of components and entity properties (abstracting serialization and deserialization. State updates can be easily performed and intercepted, providing a mechanism similar to the Observer pattern to listen to state changes and update the rendering.
If you are building with Unity, the Solana.Unity-SDK gives you all the necessary tools to connect the gaming interface with Bolt.
Prerequisites
This chapter provides you with the necessary background knowledge to get started with bolt.
Useful Resources
Rust
This guide assumes that you already have some knowledge of basic Rust. We recommend reading chapters 1-9 of the Rust book which cover the basics of using Rust (Most of the time you don't need advanced Rust to write anchor programs).
Solana
This guide assumes that you already have some knowledge of basic Rust. We recommend reading the basic concepts from the Anchor book
Anchor
Bolt is built on top of Anchor, therefore having a general knowledge of Anchor will give you the necessary tool to build the game logic. We recommend reading chapters 1-4 of the Anchor book
Bolt White Paper
Bolt white paper describes in details the architecture and the scalability solution. We recommend reading the basic concepts of ephemeral rollups in section 2.2 of the Bolt Whitepaper
Getting Started
This chapter walks you through the installation process and the folder structure of an anchor workspace.
Installation
Rust
Go here to install Rust.
Solana
Go here to install Solana and then run solana-keygen new to create a keypair at the default location. Anchor uses this keypair to run your program tests.
Yarn
Go here to install Yarn.
Bolt
Installing Bolt
Install Bolt using npm or yarn.
With npm:
npm install -g @magicblock-labs/bolt-cli
With yarn:
yarn global add @magicblock-labs/bolt-cli
Install Bolt using Cargo.
cargo install --git https://github.com/magicblock-labs/bolt --locked --force
On Linux systems you may need to install additional dependencies if cargo install fails. E.g. on Ubuntu:
sudo apt-get update && sudo apt-get upgrade && sudo apt-get install -y pkg-config build-essential libudev-dev
Verify the installation.
bolt -h
Hello, Bolt!
To initialize a new project, simply run:
bolt init <new-workspace-name>
This creates a new bolt workspace you can move into. The following are some of the important files in the folder:
- The
.anchorfolder: It includes the most recent program logs and a local ledger that is used for testing - The
appfolder: An empty folder that you can use to hold your frontend if you use a monorepo - The
programsfolder: This folder contains your programs. It can contain multiple but initially only contains a program with the same name as<new-workspace-name>. This program already contains alib.rsfile with some sample code. - The
testsfolder: The folder that contains your E2E tests. It will already include a file that tests the sample code in theprograms/<new-workspace-name>. - The
migrationsfolder: In this folder you can save your deploy and migration scripts for your programs. - The
Anchor.tomlfile: This file configures workspace wide settings for your programs. Initially, it configures- The addresses of your programs on localnet (
[programs.localnet]) - A registry your program can be pushed to (
[registry]) - A provider which can be used in your tests (
[provider]) - Scripts that Anchor executes for you (
[scripts]). Thetestscript is run when runninganchor test. You can run your own scripts withanchor run <script_name>.
- The addresses of your programs on localnet (
Run the example unit test with the following command:
bolt test
This command will register a new World instance, create an entity, attach a component, and execute a system on it.
The test script is available as a reference under the tests folder.
Anchor
Bolt is built on top of Anchor and supports all Anchor commands, in addition to some extensions. For the complete list of Anchor commands, refer to the Anchor book.
Create a Component
Components are plain data structures (classes or structs) that contain data relevant to a specific aspect of an entity. They don't have any logic or methods. Examples of components could be a "Position" component containing x, y, z coordinates.
Create a Position component with
bolt component position
which will add a new component to your workspace:
#![allow(unused)]
fn main() {
use bolt_lang::*;

declare_id!("Fn1JzzEdyb55fsyduWS94mYHizGhJZuhvjX6DVvrmGbQ");

#[component]
#[derive(Copy)]
pub struct Position {
    pub x: i64,
    pub y: i64,
    pub z: i64,
}
}
Create a System
Systems contain the logic that processes and manipulates entities based on their components. A system will typically operate on all entities that have a specific set of components. For example, a "Movement" system might update the position of a "Position" component
Create a movement system with with
bolt system system-movement
which will add a new system to your workspace:
#![allow(unused)]
fn main() {
use bolt_lang::*;
use component_position::Position;

declare_id!("FSa6qoJXFBR3a7ThQkTAMrC15p6NkchPEjBdd4n6dXxA");

#[system]
#[program]
pub mod system_movement {

    pub fn execute(ctx: Context<Components>, args_p: Vec<u8>) -> Result<Components> {

        let position = &mut ctx.accounts.position;

        position.x += 1;
        position.y += 1;

        Ok(ctx.accounts)
    }

    // Define the input components
    #[system_input]
    pub struct Components {
        pub position: Position,
    }
}
}
World Program Overview
The World Program is the entrypoint for creating world instances, entities, attaching components, and executing systems within a unified framework.
Client Development
Ongoing development efforts are focused on delivering multiple client SDKs and integrations. The World Program, a standard Anchor program, expose its Interface Definition Language (IDL) published on-chain for seamless interaction.
TypeScript SDK Installation
To install the Bolt SDK, execute the following command:
npm install @magicblock-labs/bolt-sdk
- Initiating a project with bolt init automatically generates a simple usage example of the bolt-sdk.
Creating a New World Instance
Create a new world instance as demonstrated below:
const registry = await Registry.fromAccountAddress(provider.connection, registryPda);
worldId = new anchor.BN(registry.worlds);
worldPda = FindWorldPda(new anchor.BN(worldId))
const initializeWorldIx = createInitializeNewWorldInstruction(
    {
        world: worldPda,
        registry: registryPda,
        payer: provider.wallet.publicKey,
    });

const tx = new anchor.web3.Transaction().add(initializeWorldIx);
const txSign = await provider.sendAndConfirm(tx);
Adding a New Entity
To add a new entity:
const world = await World.fromAccountAddress(provider.connection, worldPda);
const entityId = new anchor.BN(world.entities);
entityPda = FindEntityPda(worldId, entityId);

let createEntityIx = createAddEntityInstruction({
    world: worldPda,
    payer: provider.wallet.publicKey,
    entity: entityPda,
});
const tx = new anchor.web3.Transaction().add(createEntityIx);
await provider.sendAndConfirm(tx);
Attaching Components to an Entity
For attaching components:
const positionComponentPda = FindComponentPda(positionComponent.programId, entityPda, "");
let initComponentIx = createInitializeComponentInstruction({
    payer: provider.wallet.publicKey,
    entity: entityPda,
    data: positionComponentPda,
    componentProgram: positionComponent.programId,
});
const tx = new anchor.web3.Transaction().add(initComponentIx);
await provider.sendAndConfirm(tx);
Applying Systems
To apply a system:
let applySystemIx = createApplyInstruction({
    componentProgram: positionComponent.programId,
    boltSystem: systemMovement.programId,
    boltComponent: positionComponentPda,
});
const tx = new anchor.web3.Transaction().add(applySystemIx);
await provider.sendAndConfirm(tx);